I've been playing video games pretty much nonstop ever since I got my first Xbox 360.
Reviewed by Benjamin Barr
Inferno Dragon is one of the best Clash Royale cards for countering tanks and doing insane DPS, assuming you can get it to work. While it is a powerful card, Inferno Dragon isn’t the easiest one to win with. However, when you get it in the right deck, it’s a really fun card to use. In this article I’ll take a look at three great Inferno Dragon decks, so let’s get started!

How to Play Inferno Dragon
Inferno Dragon primarily functions as a counter for tanks or as a support troop. His damage starts out very low, but builds up more and more for as long as it stays attacking a target. If it gets disrupted in any way, the attack resets. So cards like Zap, Electro Wizard, and Electro Dragon are incredibly strong counters for him. He’s best when fighting tanks, as he’s able to counter everything from Giant to P.E.K.K.A. by himself. But the single-target focus and requirement to stay on one target makes him easily distractable with something as simple as Skeletons as well. So it’s easy to see why Inferno Dragon is a difficult card to win with, even if as a counter he functions pretty easily.
Inferno Dragon’s evolution is the main reason he can work as a win con (even if that is still not his main role). The evolution requires two cycles (which is one reason it’s not that popular), but once you get it ready it’s really simple. The evolved version of Inferno Dragon does not reset its attack damage when it stops attacking. So if you use it to counter a tank, it’ll build up huge DPS for whatever it attacks next. The only way to really counter a fully-charged evo Inferno Dragon is a swarm to distract it or spells, as it’ll be able to fully shred through anything else instantly. Ranged troops are also something to watch out for, but spells like Tornado and Freeze help deal with them.
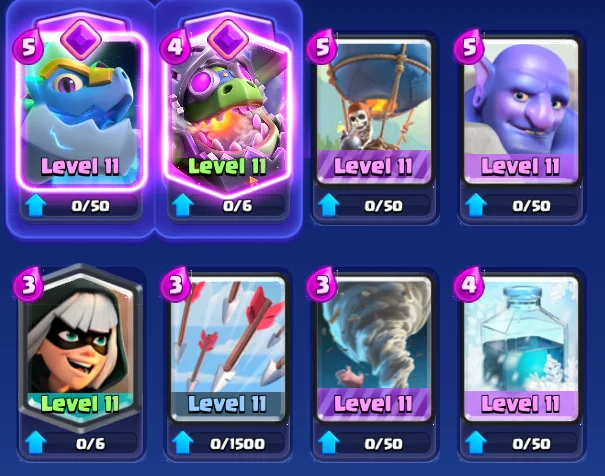
Inferno Dragon + Bowler Tornado
Cards:
- Electro Dragon (Evo)
- Inferno Dragon (Evo)
- Balloon
- Bowler
- Bandit
- Arrows
- Tornado
- Freeze
When I was researching for this article, I came across an Inferno Dragon deck in TV Royale that was basically just this one but with a different card where I have Bandit (I can’t remember what it was). This deck is pretty much just a typical Bowler/Tornado deck, but with Inferno Dragon added. I’ve really loved playing it, especially thanks to the Electro Dragon evolution. There’s something incredibly satisfying about taking out huge swarms of strong troops with it, and it’s a lot better than people give it credit for. Inferno Dragon makes taking out tanks a breeze, and Bowler can handle almost everything else. They’re a perfect pair.
Balloon is the main win con of this deck, with Bowler acting as the tank to go ahead of it. Tornado pulls everything together for Bowler to hit, plus it can also help with the Balloon’s bomb damage after death. Electro Dragon also benefits from Tornado, especially when the evolution is up. Bandit lets you be a bit more aggressive since it’s good for defending but makes a really dangerous counter push. Then we have Freeze, which makes this whole deck twice as dangerous. Freeze is perfect for stopping towers from defending against Balloon, taking out threats like Minion Horde (temporarily), and even stopping enemy pushes if needed. Plus, as with this whole deck, Tornado can group everything up perfectly so you Freeze their whole team at once.
You have to be aggressive with any Balloon deck, but the Bowler+Tornado synergy with Freeze added in makes it easier to be defensive. This deck can more consistently get the Balloon to the tower, so you don’t have to rely as much on spamming them.
Inferno Dragon + Golem

Cards:
- Inferno Dragon (Evo)
- Baby Dragon (Evo)
- Golem
- Lightning
- Knight
- Bomb Tower
- Goblin Horde
- Barbarian Barrel
The introduction of Baby Dragon’s evolution has brought new life into Golem decks, and Inferno Dragon fits these decks perfectly. Golem decks are all about creating a single huge push with Golem at the front, backed up with various support cards. Baby Dragon is perfect for clearing troops that try to fight Golem, and the evolution’s speed boost works great for the ultra-slow Golem. Inferno Dragon, with his tank-clearing abilities, is basically the exact opposite of Baby Dragon since he clears tanks and Baby Dragon clears swarms. Both cost 4 elixir, have 2-cycle evolutions, and work as excellent backup for Golem.
The rest of this deck is exactly what you expect from a Golem deck. Knight is a cheap tank to answer any mild threats, Lightning is a high-elixir spell for clearing out mid-HP troops, and Goblin Guide is the best swarm for general use. These three cards are the most powerful backup cards to use along with Golem in this deck. Bomb Tower is purely for defending, and Barbarian Barrel counters everything from general swarms to Goblin Barrel. You just want to wait until double elixir, play a Golem, then use evolved dragons and hope the counters they use are easily hit by Lightning.
Golem decks require patience, as you can only really afford 2 good Golem pushes in any game. Sometimes you only get the chance for one. You’re best off waiting until double elixir, but you don’t have to if you get a really good opportunity. Golem decks are a ton of fun and can lead to 3-crown victories, but you do have to wait for good opportunities before just going all in.
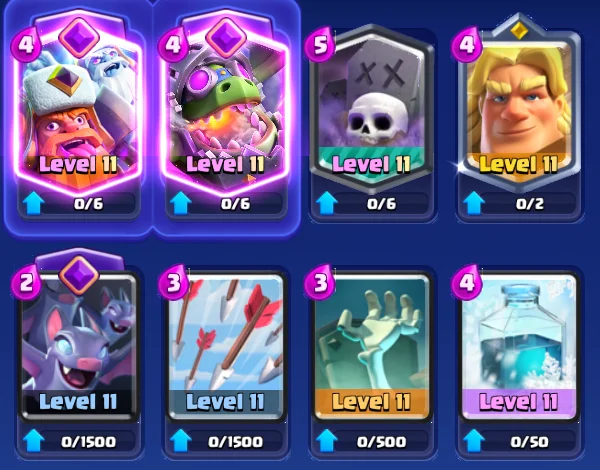
Inferno Dragon + Lumberjack/Freeze
Cards:
- Lumberjack (Evo)
- Inferno Dragon (Evo)
- Graveyard
- Golden Knight
- Bats
- Arrows
- Tombstone
- Freeze
For one last Inferno Dragon deck, I came across one that uses the classic Graveyard + Freeze combo. Graveyard builds up a huge skeleton wave, then Freeze can prevent towers from fighting back against them. This gives Graveyard enough time to build up its numbers so the Skeletons can potentially take out a whole tower in one go. Lumberjack is the first evolution, as it is generally strong and also fits the theme of going all in at towers. Freeze can help Lumberjack get to the tower so its evolution’s ghost can chop away at enemy towers. Inferno Dragon also benefits from this just like in the second deck. Freeze is a great card to pair with Inferno Dragon since it needs as much time as possible to build up its attack, and this is even stronger with the evolution.
Other than those pairs, this deck also has Golden Knight as a generally strong troop that can clear waves or fight, Bats to counter tanks or flying troops, and Tombstone for any building-targeting troop that needs to be dealt with. This deck doesn’t have any major holes in defense, especially with Arrows to clear up anything that gets past the troops.
You’re best bet here is to be super aggressive. I think this is about as aggressive as you can get with Inferno Dragon before you start to sacrifice defensive troops (which isn’t worth it). Learning to use Freeze optimally is the hardest part of this deck, as it can make or break each game.
Clash Royale Navigation
- Clash Royale: All Hero Cards Ranked
- Clash Royale: Best Defensive Cards
- Clash Royale: 7 Best Epic Cards Ranked
- Clash Royale: 5 Most Underrated Cards (2025)
- Clash Royale: All Cards Ranked (2026 Update)
- Clash Royale: Spirit Empress Guide
- Clash Royale: Best Tower Troops
- Clash Royale: Best Cards for Draft Battles
- Clash Royale: How to Win Mega Draft and Best Cards
- Clash Royale: All Champion Abilities Ranked
- Clash Royale: All Spell Cards Ranked
- Clash Royale: Best Evolutions, Ranked
- Clash Royale: All Champion Cards Ranked Worst to Best
- Clash Royale: Best Legendary Cards, Ranked
- Clash Royale: Best Decks for Arena 20 (Boot Camp)
- Clash Royale: Best Decks for Arena 19 (Dragon Spa)
- Clash Royale: Best Decks for Arena 18 Silent Sanctuary
- Clash Royale: Best Deck for Arena 17 (Royal Crypt)
- Clash Royale: Best Deck for Arena 16 (Executioner’s Kitchen)
- Clash Royale: Best Decks for Arena 13 Rascal’s Hideout
- Clash Royale: Best Decks for Arena 11 Electro Valley
- Clash Royale: Best Decks for Arena 8 Frozen Peak
- Clash Royale: Best Decks for Arena 7 Royal Arena
- Clash Royale: Best Decks for Arena 3 Barbarian Bowl
- Clash Royale: Best Decks for Arena 2 Bone Pit
- Clash Royale: Best Decks for Arena 1 – Starter Decks
- Clash Royale: Best Decks for Arena 5 Builder’s Workshop
- Clash Royale: Best Decks for Arena 15 Miner’s Mine
- Clash Royale: Best Decks for Arena 9 – Jungle Arena
- Clash Royale: Best Decks for Arena 12 Spooky Town
- Clash Royale: Best Decks for Arena 6 P.E.K.K.A.’s Playhouse
- Clash Royale: Best Decks for Arena 10 Hog Mountain
- Clash Royale: Best Decks for Arena 14 Serenity Peak
- Clash Royale: Best Decks for Arena 4 Spell Valley
- Clash Royale: Best Hero Barbarian Barrel Decks
- Clash Royale: Best Heroic Magic Archer Decks
- Clash Royale: Best Heroic Mega Minion Decks
- Clash Royale: Best Heroic Ice Golem Decks
- Clash Royale: Best Heroic Musketeer Decks
- Clash Royale: Best Heroic Goblins Decks
- Clash Royale: Best Heroic Knight Decks
- Clash Royale: Best Heroic Giant Decks
- Clash Royale: Best Emotes to Spend Gems On
- Clash Royale: 5 Most Underrated Cards (2025)
- Clash Royale: Best Ways to Spend Gems and Gold
- Clash Royale: Spirit Empress Guide
- Clash Royale: Merge Tactics Beginner’s Guide
- Clash Royale: 7 Best Win Cons (2025)
- Clash Royale: Best Tower Troops
- Clash Royale: How to Win Mega Draft and Best Cards
- Clash Royale: All Champion Abilities Ranked
- Clash Royale: A Getting Started Guide
- Clash Royale: News & Events
- Supercell Games: Clash Royale vs Clash of Clans vs Brawl Stars
- Clash Royale: Beginner Guide, Tips, and Strategy
- Clash Royale: Best Decks to Climb Trophy Road (2026)
- Clash Royale: Best Heroic Mini P.E.K.K.A. Decks
- Clash Royale: Best Graveyard Decks
- Clash Royale: Best Meta Decks (January 2026)
- Clash Royale: Best Witch Evo Decks
- Clash Royale: Best P.E.K.K.A. Decks
- Clash Royale: Best Mirror Decks
- Clash Royale: Best Evo Goblin Cage Decks
- Clash Royale: Best Evo Mortar Decks
- Clash Royale: Best Battle Ram Decks
- Clash Royale: Best Evolved Royal Hogs Decks
- Clash Royale: Best Elite Barbarians Decks
- Clash Royale: Best Hunter Decks
- Clash Royale: Best Royal Ghost Evolution Decks
- Clash Royale: Best Evolved Skeleton Army Decks
- Clash Royale: Best X-Bow Decks
- Clash Royale: Best Inferno Dragon Decks
- Clash Royale: Best Hog Rider Decks
- Clash Royale: Best Balloon Decks
- Clash Royale: Best Lumberjack Decks
- Clash Royale: Best Three Musketeers Decks
- Clash Royale: Best Giant Decks
- Clash Royale: Best Sparky Decks
- Clash Royale: Best Evolved Baby Dragon Decks
- Clash Royale: Best Miner Decks (2025)
- Clash Royale: Best Prince Decks (2025)
- Clash Royale: Best Free-2-Play Decks (2025)
- Clash Royale: Best Royal Recruits Decks
- Clash Royale: Best Touchdown Decks
- Clash Royale: Best War Decks
- Clash Royale: Best 2v2 Decks
- Clash Royale: Best Mega Knight Decks
- Clash Royale: Super Witch & Hexed Havoc Best Decks Strategy


You must sign in to comment.
Don't have an account? Sign up here!