Much has changed since the launch of PlayerUnknown’s Battlegrounds in 2017. After it won the first round in the fight for battle royale dominance, a flurry of new competition emerged. Now it’s a three-way struggle between Fortnite, Apex Legends, and PUBG. Even so, the original battle royale retains an incredible amount of attention.
The inaugural pro-league season is now in the books. PUBG Corp is set to hit the reset button for 2020, leaving plenty of time to get serious about your PUBG play. This updated 2022 settings guide is perfect for both the newb and seasoned veteran looking to gain an edge and get that chicken dinner.
Please note, these settings are based on professional PUBG players and team averages. No player or team has exactly the same settings. Feel free to alter and adjust them around your own “muscle memory,” preferences, and setup. Ready to go? Let’s get started.
Best PUBG PC Settings
No matter your setup, it’s best to focus on balancing performance and visual clarity. Higher frames per second (fps), lower latency, and distinguished long-distance in-game visuals are a sure-fire way to gain an edge before you even pull the chute.

The next few sections are for PUBG players using the PC Edition of the game. They outline the optimal mouse, keyboard, visual, and audio settings for competitive play. Ready to go at it with the pros on PC? Let’s dive in.
Best PUBG Mouse Settings for PC
PUBG sets all in-game sensitivity settings to a default of 50. It’s not a terrible preset, but as you’ll see, it takes some tooling to find the right fit for your playstyle. Most professionals lower all sensitivity settings for greater precision for long-range targets. While you should account for this, be sure to focus on finding settings that allow for speed and accuracy in gunfights.
The following settings are based on averages from Team Liquid, Faze Clan, and TSM.
DPI: 400 – 800
Over 90% of professional PUBG players use a DPI (dots per inch) of 800 or less. This DPI sweet spot originated from the muscle memory they developed from playing CS: Go and Call of Duty. Even for new players who never touched those titles, this DPI range is a great place to start. It allows for quick movement in firefights, and enough control to effectively survey the landscape.
Mouse Acceleration: Off
The faster your movement, the faster the mouse moves. Mouse acceleration may appear to be an ideal firefight solution, but it actually disrupts your playstyle. Turning it off delivers consistent gameplay, allowing you to build muscle memory without disruption.

General Sensitivity: 43
Slightly lower than the default, this sensitivity setting allows for greater control. Many professionals with aggressive playstyles will lower this to the mid-to-low 30’s. Still, anything below 50 will provide excellent precision.
Vertical Sensitivity Multiplier: 1
Y-axis sensitivity multiplier in relation to horizontal mouse movement. Set this to 1 for best results.
Aim Sensitivity: 40
Great for precise hip-firing and scoped target tracking. Again, this drops far enough below the default for greater precision.
ADS Sensitivity: 40
Sensitivity when aiming down iron or non-magnified sights. Set this to 40 for a balance of speed and control.
Scoping Sensitivity: 40
No matter what you set the Scoping Sensitivity to, be sure that it matches the ADS Sensitivity. By keeping these at the same sensitivity, you create consistency between firing types. Like most of the settings on this list, it helps you develop muscle memory around the setting.
Scope 2x | 3x | 4x | 6x | 8x | 15x Sensitivity: 40
Keep in mind that the longer the range of the scope, the more sensitive it will be. Dropping this sensitivity to 40 as well offers a great starting point, but feel free to go as low as feels comfortable.
Best PUBG Keybinds for PC
“Best” keybinds may be a misnomer, as the right keybinds depends on your particular playstyle and gaming setup. Rather, these are the most popular keybinds.
These keybinds are based on a mix of the default PUBG controls, along with Shroud and Team Liquid. Both Shroud and Team Liquid have found specific keybinds for weapons and movement that a majority of players and streamers have started to replicate as of late. The style of these keybinds is all about keeping most actions close together, while taking full advantage of the secondary buttons on the mouse.
Common Keybinds

Combat Keybinds

Best PUBG Graphics Settings for PC
Next, let’s take a look at video and in-game display settings. Continuing the practice from above, we’ve outlined the average scores based on pro player’s actual setups.
Refresh Rate: 144Hz – 240Hz
At one point, PUBG locked the max refresh rate to 144 fps, leading to setups built around the setting. The rule of thumb is to push your monitor toward 60 fps with a 144Hz option. This provides an input latency of 55 – 75 ms (milliseconds). Excellent settings, by any standard.
Nowadays, you can go even further by opting for the 240Hz option, which brings input latency down to 20 – 35 ms.
To achieve this setting, the consensus amongst most pros is to use the RTX 2080TI. Using this graphics card achieves 200 fps on a 1920×1080 display. For those on a budget, other options include the RTX 2080 (188 fps) or the GTX 1080TI (180 fps). Both will achieve an fps setting well above the desired range.
Display Settings

Display Mode: Fullscreen
Set to Fullscreen to achieve the most frames per second possible.
Resolution: 1920 x 1080 or Auto
60% of professionals currently play with a 1920 x 1080 display. The remaining pros (36%) use either a lower-res screen or opt for 4k enabled monitors. You should shoot for anything that gives you 1080p, if your setup allows for it. Avoid playing in 4k and sacrificing frames. The goal for your setup is to improve latency and on-screen fluidity.
The other option is to set the resolution to your native resolution. PUBG should take care of this for you automatically.
Lobby FPS Cap: Unlimited
Keep this at unlimited, as it doesn’t have a significant impact on performance.
In-Game FPS Cap: Unlimited
Unless your machine is struggling, set your in-game FPS cap to unlimited for maximum potential.
Smoothed Frame Rate: Disable
Basically, this is an in-game version of V-Sync that leads to greater input lag. Our recommendation? Turn it off.
Brightness: 50
In terms of brightness, 50 is a good place to start. But you should adjust it depending on the circumstances.
Universal Brightness for all Maps: Enable
Enable this setting for ease of use. Once you’re familiar with the maps and how brightness affects each one differently, adjust this to your liking.
Advanced Settings

Render Scale: 100
Always match the native resolution of your monitor. If it’s set to render in a higher resolution, you’ll experience severe frame rate drops.
FPP Camera FOV: 100 – 103
The default setting is 90, with most pros expanding to 100 – 103 for a wider field of view while in 1st person. Utilizing an expanded FOV does improve your peripheral vision when scanning for enemies. Luckily, doing so doesn’t lead to any performance issues.
Overall Graphics Quality: Custom
See the changes we’ve suggested for each setting below.
Anti-Aliasing: Medium
The idea with anti-aliasing is that the higher the setting, the smoother the graphics. Set it too high, and visual assets begin to look blurry at greater distances. Set it too low, and everything becomes too jagged and unrecognizable. By setting it to medium, you get slightly jagged graphics without dipping into unrecognizable landscapes or buildings territory.
Tip: If you can’t save frames elsewhere, drop the Anti-Aliasing setting down to Low to make up for it.
Post-Processing: Low
Post-processing dictates the lighting effects, and if set too high, it will lead to drops in frame rate. Selecting Low keeps the visual benefits of post-processing without killing fps, and it avoids difficult visibility conditions in dark locations that occur at higher settings.
Shadows: Very Low
Early versions of PUBG displayed no shadows at the Low and Very Low settings. That’s since changed in recent updates. Shadows are some of the biggest drains on processing power and frame rate disruptions. Additionally, higher shadow settings make visibility extremely poor in dark locations.
Textures: Medium
The higher the setting, the easier it will be to spot differences between enemies and landscapes. The medium textures setting is the sweet spot between visibility and performance. You’ll see a drastic difference in performance when switched up from the Low setting.
Tip: If you own a higher-powered PC and can spare the processing power, switch to the High or Ultra setting. The change in visibility won’t be as drastic, but it does provide an edge without dips in performance.
Effects: Very Low
Like shadows, the effects setting can be very taxing on your system and severely curbs the frame rate. Higher effects settings only add detail and clarity to smoke and explosions. You won’t be missing much at the lower setting.
Foliage: Very Low
Another setting that adds unnecessary detail to in-game assets like grass, trees, and other shrubberies. The higher the foliage setting, the harder it is to spot enemies in tall grass, and the greater the dips in frame rate.
View Distance: Low
Most professionals have found minimal benefit in the High and Ultra settings. That’s because view distance only affects landscape assets. The real game-changer is that players and vehicles remain untouched. For those needing to squeeze every frame out of their settings, choose Low as your default choice.
Sharpen: Disable
This setting isn’t all that important for performance. It basically adds in clearer outlines and “sharper” textures. Due to the lack of impact on frame rate, choosing to have it on or off should be left to your personal preference.
V-Sync: Disable
Adds to input lag and should only be turned on if you experience terrible screen tearing.
Motion Blur: Disable
Motion blur creates smoother graphical movements but leads to hampered visibility at longer distances.
Best PUBG Audio Settings for PC

There isn’t all that much to optimize by way of PUBG’s audio settings, but we do have a handful of tips to help you get ahead:
- Turn-off all SFX plug-ins
- Use headphones that have high-quality stereo audio settings.
- Max out all in-game volume and adjust the PC volume mixer to the desired effect.
These tips will help you hone in on footsteps and gunfire audio. Additionally, the stereo setting helps identify the range and direction of the sound.
Best PUBG Console Settings
If your go-to platform for playing PUBG is a console — e.g., the PS4 or Xbox One — you may think that there’s not much you can do about settings. While there are fewer settings options (you’re locked into a specific processor, after all), there are still changes you can make.
Check out our rundown of the best in-game settings to help you get an edge against fellow console players.
Do note, however, that these are just averages and should serve as a basis. Test and change settings to see what works best for you. Be sure to give yourself enough time with specific settings to retain muscle memory. These are a great place to start and represent the typical setting or range used by most pros.
Best PUBG Controller Settings for Console
Typically, controllers are second to mouse and keyboard when it comes to playing competitively. But nail down the right configuration, and you can give your dual-wielding counterparts a run for their money. Check out the controller settings below to gain the maximum edge.

Controller Button Preset: Type B
A majority of pros and streamers recommend this button preset. They state that it feels the most natural among the presets and allows for more fluid transitions between weapons.
X and Y Axis: Optional
Your choice — it depends on what feels best to you.
Right and Left Stick Dead Zone: 12 – 25
Keep this setting on the lower end, and be sure to keep
both the right and left stock at the same sensitivity.
Vibration: Off
This is really your choice, but many claim that vibrations affect aiming due to kickback when firing.
Forward Running: 10
Keep sensitivity low to allow for responsive and deliberate movements. It also helps keep your movement speed up without always breaking into a run.
Movement Sensitivity: 8 – 20 or 35 – 50
There are contrasting opinions on this sensitivity, with some players keeping a similar setting to forward running and others pushing it well beyond. This one is genuinely up to your playstyle and depends on if you want quick movements or a potential balance between the two movement settings.
Vertical Sensitivity: 75 – 100
This setting is tied to the right analog stick and refers to the sensitivity going up and down.
General Sensitivity: 12
Keep the general movement somewhere in the middle and off-set it with a higher vertical movement as indicated above.
Vehicle Driver Sensitivity: 10
Keep vehicle driver sensitivity around 10 (somewhere near the middle) to avoid crazy movement speeds that make it difficult to orient yourself.
Aim Acceleration: On (4)
Aim acceleration is a useful tool in small quantities and can help you keep up when scoping in on enemies.
1x | 2x | 3x Scope: 10 – 15
Keep these settings lower for responsiveness and stability, and at the same value to build consistent muscle memory.
4x | 6x | 8x Scope: 15
Up these scoped settings slightly to achieve greater stability.
16x Scope: 20
Max out this setting for greater responsiveness. It’s always more challenging to follow targets accurately on console, and this assures you’ll retain stability.
Best PUBG Graphics Settings for Console

You’re much more limited when customizing PUBG graphics settings on console than you are on PC. Still, there are a few changes you can make for maximum competitiveness.
FOV: 98 – 103
Unlike PC, a higher FOV doesn’t add in the additional peripheral view. Instead, it may be more beneficial to decrease the FOV, depending on the size of your screen. With smaller TV’s, reducing the FOV can actually make targets in the center of the screen slightly larger and more apparent. This will require some testing to see what best suits your TV size.
Brightness: 60 – 80
Brightness may need to be altered based on the map you’re playing. That said, decreasing it from the start does add a slight improvement in separating enemies from the foreground on console.
Kill Feed: Graphic
Kill feed type set to graphic means that when enemies are taken down, weapons are represented with graphics for quick visualization
Color Blind Mode: Normal
Since PUBG doesn’t allow for specific changes to colorblind settings, it’s recommended to set to normal. Unless, of course, you are colorblind.
Best PUBG Audio Settings for Console
Similar to the PC settings, you’ll want to max out all in-game audio and mess with the sound mixer on your headset. When choosing a headset, be sure that it’s capable of switching to Stereo Surround Sound for better triangulation and situational awareness.
Best Peripherals for PUBG
We’ve had a look at the best PUBG settings, but that’s only half the battle. Your gear and setup completes the ensemble for a competitive advantage that rivals the pros.
In the sections below you’ll find the best gear on the market, as determined by comparing countless pro setups and consumer reviews. In order, you’ll find the best mouse, keyboard, headset, and monitor for PUBG, with the two top models from each category featured.
Best Mouse for PUBG
Here’s what many of PUBG’s pros are using as their go-to’s.
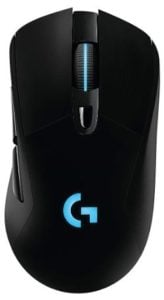
1. Logitech G Pro Wireless
The best mouse for PUBG
Manufacturer: Logitech | Type: Wireless | Buttons: 7 | DPI: 16,000 | Price: 💰💰💰
Logitech has become the go-to brand for professionals and streamers alike, due to their consistency across models and dedication to continuous improvement. Case-in-point? Wireless gear used to be a poor choice for eSports professionals. But thanks to Logitech’s Lightspeed Technology, the G Pro Wireless Mouse is now the ideal option for PUBG players seeking low latency and (nearly) non-existent lag. Not only that, but this mouse features all the bells and whistles, including 7 programmable buttons and 16K DPI.
- USERS LIKE
- Used by top eSports pros
- Responsive wireless design
- Ultra lightweight endoskeleton
- USERS DISLIKE
- Slippery design
- Double clicking issues
- Very expensive for a mouse
2. Logitech G703
The best PUBG mouse runner-up
Manufacturer: Logitech | Type: Wireless | Buttons: 6 | DPI: 12,000 | Price: 💰💰
Looking for a more affordable mouse that doens’t sacrafice on too many features? We’ve got you covered there, too.
The Logitech G703 costs half that of the G Pro, but it’ll still have you zipping across the map at light speed. That’s all thanks to the cutting-edge PMW3366 sensor that glides across your mousepad, responding to every quick flick of your wrist or scoped-in micro-movement. Combined with its 6 buttons, this is one mouse you don’t want to miss.
- USERS LIKE
- Latency-free gaming
- Excellent mousing software
- Fantastic tracking and responsiveness
- USERS DISLIKE
- Inconsistent battery lift
- Issues with double clicking
- May be too big for small hands
Best Keyboard for PUBG
Our top picks…
1. Logitech G Pro
The best keyboard for PUBG
Manufacturer: Logitech | Type: Wired | Layout: Tenkeyless | Switches: Romer G | Styles: 1 | Price: 💰💰
A good keyboard is all about compact design and accurate keypresses. And that’s exactly what you get with the Logitch G Pro. Designed with the same attention to detail as other Logitech products, The G PRO Gaming Keyboard combines quality craftsmanship with lightweight materials to deliver an extremely formidable weapon. In the hands of the right PUBG gamers, the G Pro and its responsive Romer-G Switches will have you outpacing the competition every step of the way.
- USERS LIKE
- Striking tenkeyless design
- Romer-G Switches are smooth as butter
- Excellent program-ability with Logitech Software
- USERS DISLIKE
- Poorly designed cable
- The LEDs are washed out
- Reports that it disconnects unexpectedly
2. HyperX Alloy FPS Pro
The best PUBG keyboard runner-up
Manufacturer: HyperX | Type: Wired | Layout: Full | Switches: Cherry MX | Styles: 2 | Price: 💰💰
Need a keyboard at a lower price point? HyperX offers the Alloy Pro at different keyboard sizes, making it a versatile option with less of an investment.
But how does it perform? For one, the HyperX boasts Cherry MX Switches for top-tier actuation and in-game responsiveness. It doesn’t get better than Cherry. It also comes with all the must-have gaming tech, including NKRO and 100% anti-ghosting. As for style? Don’t even get us started on the entrancing red backlit keys and dynamic lighting effects.
- USERS LIKE
- Authentic Cherry MX Switches
- Durable metal top plate
- Braided (and detachable) cable
- USERS DISLIKE
- Keys prone to popping off
- Slight ‘ringing’ while typing
- Keycaps fade and scratch easily
Best Headset for PUBG
Our top picks…
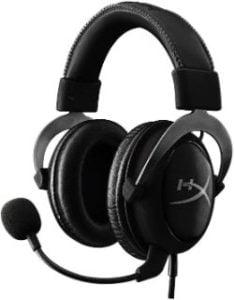
1. HyperX Cloud II
The best headset for PUBG
Manufacturer: HyperX | Type: Wired | Quality: 7.1 Surround Sound | Mic: HyperX Digitally Enhanced | Connection: 3.5mm & USB | Price: 💰💰
Ready for next-level immersion in PUBG’s latest map? Experience the hype for yourself with the HyperX Cloud II Gaming Headset.
This headset is everything you need to gain the upper hand in PUBG, including powerful 53mm neodymium drivers for unbridled 7.1 surround sound, as well as a detachable mic for top-tier comms with your squad. Plug in the USB adapter, adjust the in-line controls, and game at full throttle.
- USERS LIKE
- Clear, vibrant sound
- Comfortable for extended periods
- Effective noise-cancelling technology
- USERS DISLIKE
- Short 3-foot cable
- Poor customer support
- Controls only work via USB
2. SteelSeries Arctis T Pro
The best PUBG headset runner-up
Manufacturer: SteelSeries | Type: Wireless | Quality: 7.1 Surround Sound | Mic: Clear Cast | Connection: 3.5mm, Optical, & USB | Price: 💰💰💰💰
First things first — this headset ain’t cheap. With a price tag nearing the $300 mark, it may take a couple paychecks (and perhaps your first-born child) to pay it off. The upside? The SteelSeries Arctis Pro is gaming like you’ve never heard before.
In terms of performance, this headset features 2.4G wireless connectivity, premium high-resolution speakers, and the best mic in gaming, aka the Clear Cast. It’s made from lightweight steel and aluminum alloy, and the whole configuration comes with a control box complete with OLED screen. For those seeking the best audio quality in PUBG, this headset is a must.
- USERS LIKE
- Virtually zero audio lag
- Innovative headset controls
- Extremely comfortable for long-term gaming sessions
- USERS DISLIKE
- Unbelievably expensive
- Cheap mic retraction mechanism
- Small design may not work for some gamers
Best Monitor for PUBG
Our top picks…
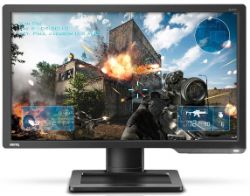
1. BENQ XL2411
The best monitor for PUBG
Manufacturer: BENQ | Display: 24″ TN Panel | Resolution: 1080p | Refresh Rate: 144hz | Response Time: 1ms | Price: 💰💰💰
Believe it or not, seeing your opponents is crucial for taking them down. And that’s where the BENQ Zowie XL2411P comes in.
Step out of the shadows and into the light with this powerhouse 24-inch monitor complete with Black eQualizer and Color Vibrance technology. It’ll have you gaming in crystal clear 1080p, kicking butt atop a 1ms response time and 144hz refresh rate. Bring it home, adjust it to perfection via the built-in VESA mount, and annihilate the competition.
- USERS LIKE
- Quality craftsmanship
- Clear, bright, and vibrant display
- Unrivalled response time & refresh rate
- USERS DISLIKE
- Clunky controls
- Prone to dead pixels
- 120hz+ RR requires DisplayPort
2. ASUS VG248QE
The best PUBG monitor runner-up
Manufacturer: ASUS | Display: 24″ TN Panel | Resolution: 1080p | Refresh Rate: 144hz | Response Time: 1ms | Price: 💰💰💰
ASUS PECT (see what I did there?) that you could use a monitor upgrade. If so, the VG248QE is a fantastic choice.
This monitor boasts specs similar to the BENQ above, with a few caveats. The first is that this monitor boasts built-in 2W speakers for top-tier versatility and added immersion. The second is ASUS’ full suite of built-in software, including Smart Contrast Ratio for fine-tune visual control over your PUBG experience. Load ‘n load, baby.
- USERS LIKE
- Built-in speakers
- Sharp matte display
- Excellent fps potential
- USERS DISLIKE
- Poor text clarity
- Inconsistent lighting
- Gets stuck in Standby Mode
Putting it to Practice
You’ve got your settings straight and your gear all set up. Excellent. Now it’s time to put it all to practice. How? Jump into a match and test things out, of course!

Some settings will feel good, and others won’t. Remember, you’ll find many pros falling slightly above, below, or within the range of settings listed. These averages are a great place to start and allow for refinement while remaining competitive. Just remember to balance visual clarity and performance. It may look pretty, sure, but that doesn’t mean it translates well to lag-free cometitive play. To that end, prioritize high frame rate and low latency when making decisions, and you can’t go wrong.
Above all else? Just have fun with it.
Related Reading









You must sign in to comment.
Don't have an account? Sign up here!